Step-by-Step Guide to Adding a Featured Image
Step 1: Log in to Your WordPress Dashboard
- Go to your WordPress site’s login page (usually
yourwebsite.com/wp-admin). - Enter your username and password and click Log In.
Step 2: Navigate to the Post or Page
- In the WordPress dashboard, click on Posts or Pages, depending on where you want to add the featured image.
- Choose the post or page you want to edit by clicking its title or click Add New to create a new one.
Step 3: Locate the Featured Image Panel
- In the post or page editor, scroll down the right-hand side until you find the Featured Image panel.
- If you’re using the block editor (Gutenberg), the panel will be in the Settings sidebar under the Post tab.
- If you don’t see the panel, click the Options (three dots in the top-right corner), select Preferences, and enable Featured Image under the “Panels” section.
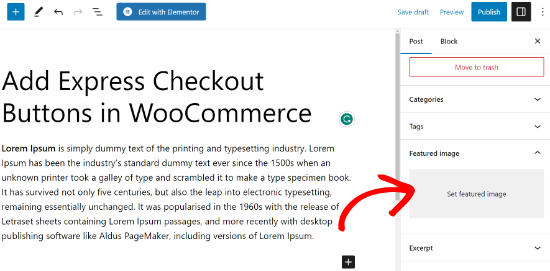
Step 4: Upload or Select an Image
- Click the Set Featured Image button.
- You’ll see the Media Library, where you can:
- Upload a new image: Drag and drop an image or click Upload Files and select an image from your computer.
- Choose an existing image: Select an image from your media library.
- Once you’ve selected or uploaded the image, click the Set Featured Image button at the bottom-right of the screen.
Step 5: Save Your Changes
- If you’re editing an existing post or page, click Update.
- If you’re creating a new post or page, click Publish.